Monday, November 22, 2010

House at Half!

While I've been running around NY, E's been arranging for the installation of the kitchen counters and the final inspection on the house. There was a bit of a monkey wrench thrown into the counter-top situation when the guy we hired told us several weeks into the project that he didn't have enough of the granite to do the full project. With our final inspection approaching E went and took at look (along with many pictures) at some of the other options at the stone shop. Thankfully I'd seen several of the slabs before. The slab that has become our island was once a contender for the bathroom vanity. I rightfully decided that it was a bit too bold for the bathroom but it has a second life in our kitchen!

I'm still somewhat sad that the granite I'd grown to love wasn't going to work out, but in the end, we have what was in the original plan. Not too shabby if you ask me.


With all the extra light we created in the room, I didn't need to worry about dark counter-tops. Opening the doorway from the laundry room by widening it and lifting the header into the ceiling was so much more significant that I expected.


The back half of the house is complete - almost. There are still a few details to shake out in the kitchen. Basically, I need to tile the back splash and put the mirror up behind the"built-in" and E has some molding to put up above the cabinets. But, still, really, it's pretty much done. Mostly.

Sunday, October 31, 2010

Appliances

In they go!

See them and weep with joy:


The counter tops are still plywood. It's uncertain how long it will take to get the counter tops installed. I'm out of town and E is working on his music so as long as everything is all ready in time for the final inspection, we're golden.

Sunday, October 17, 2010

Floored

Here we have the old kitchen flooring, rotted laminate over rotted particle board over rotted fir flooring. Behold, the power of dog urine:After ripping back the laminate, chiseling off chunks of particle board 2" at a time, prying the fir off with a crow bar then pulling each and every stinkin' nail out of the sub-floor, matching white strip oak was laid and seamlessly integrated into the existing dining room floor.

The wood floors in whole house (minus the master bedroom) got a sanding and were refinished. I was surprised to see the floors were in pretty good shape so we were able to go with a natural finish.
Here's a look back at the original state of the floors.
New floor laid down and old floor sanded:
Looking the other way:And finished!The dark hall of doom along with broken and corroded floor heater:Patched up and lighter:This photo is my favorite. We have mahogany inlay, even in the little entry!


Exterior Ta-Da

Just in case you forgot how pretty the house was before, here's a shot. I do notice that the lawn was alive at this point, but taking that out of the equation, I think we made a significant improvement with the final paint job.Here's the pretty lady now. Please note, we did not paint the steps the powder blue. They were painted by the previous owner or real estate agent after they took the "buy me" photo:
I'm thinking of painting the front steps a light charcoal color. Something to hopefully ground them and diminish their gargantuan size. I'm sure once some foundation plants go in, it'll help the situation as well.

Here we have the front door in the "before" state. Yes, the wood was scraped raw and left to weather on the face and painted pink around the window panes.
E did a bang up job building steps for three of the doors to the outside.

We have a new back porch light as well.


Tuesday, September 28, 2010

Grandma's Visit

You're thinking to your self, "Three posts in one night? Doesn't this lady have a life?" What can I say, I've either been slacking in the posting department, really slaving away on the house in the recent week with no time to blog, or a combination of the two.

What do you do when your grandma comes to visit? Me, I get up at the crack of dawn and paint the house, and so does my grandma. We coated the house with GALLONS of paint. Two coats of tinted primer went on the new stucco which I swear consisted of half the house. One coat of primer went on the whole house. Using tinted primer was the key. The new stucco sucked the paint up. We added the top coat and there are still a few patches here and there that we (we, meaning me, now that my grandma has left town, and E if he is unlucky) need to touch up. We moved onto the trim and made it about half way around the house. I'll work my way around the other half in the next week.

The following photos are very misleading. I warn you, none of what you are about to see is the truth, except for the photo of the dog. The truth is, Grandma was the task master around here, I just posed for the picture.

Grandma was working away. She was unstoppable. Yes, she is on a ladder. No, I did not sanction such action. Come to think of it, I have no idea where she got the ladder. Seriously, I don't recognize that ladder, I don't even believe it exists. Truly, this whole this is a mirage caused by the uncharacteristic heat we've been having. (Painting in the heat is the pits)


Sophie supervising. All of what you're seeing below is the unadulterated truth.


Me supervising. In stark contrast to the previous picture, there's a great deal of embellishment happening below.


Again I say, lies, lies, all lies.


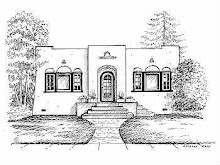
Here's a little peak at the finished product. I'll of course post full photos once it truly is finished.

MASTER BATH BEFORE & AFTER

Yes, I did mean to type the title of this post, in all caps. I am SHOUTING if you care to know.

The tour, BEFORE:


AFTER:


Blog by E

This has been an exciting/exhausting last few weeks. Everything we are doing now makes a huge difference in the appearance and is quite gratifying.

Painting continues... here's a rare picture of my lovely wife painting the closet doors.

This picture might be a bit out of chronological sequence with respect to the other blog posts, but since the painting never seems to stop it works.

The master bathroom is finished! I installed the towel bars, the vanity, the toilet, and the shower fixtures over the course of several days. Unlike the apartment plumbing, which I did about a year ago... everything went smoothly and I haven't detected any leaks so far.

Here's a picture of the installed vanity.

And then a closeup of the plumbing underneath.

Notice the little angle brackets that secure the vanity to the wall for when the next big earthquake hits. My dad helped me cut and glue the wood base for under the marble countertop, and then our friendly neighbor helped set it down on the cabinet. I'm sure K will put up a picture of the completed bathroom in an upcoming post, but I'll mention now that the consensus between the contractor, the neighbors, and the family is the bathroom is a timeless beauty.

What to do after finishing the bathroom? Throw in the kitchen cabinets! Our contractor kept his word and offered up 2 of his guys (for free!) on a Saturday to help me get started. While I'd say putting in cabinets isn't rocket science, having a few experienced hands helping certainly cut out most of the learning curve.


This is a picture of all the cabinets in place. I still need to do the island but that will happen after we have a floor. Again, smooth sailing and I'd say that overall, this project took about 1/2 the time I though it would.

Here's 1 of 6 under-cabinet LED light fixtures.


The microwave...


The dog...


Finally, no post would be complete without a solar or heating system update... The solar water collector is increasing in efficiency as the solar elevation angle aligns more closely with my near vertical mounting, and the system is overheating. Water temperatures in the tank are over 180-deg and with very little hot water usage, the pump is shutting off, causing stagnation in the collector. I need to finish my heat-dump loop and add the underground circuit to dissipate this excessive heat.